Missing VSAN menu options in HTML5 webclient VMware vCenter due missing plugin

Recently I deployed a new SDDC based on the latest vSphere 6.7 release. VMware is really pushing the HTML5 client and that is absolutely fine by me but it’s still not 100%. I’m really wondering if the U1 release targeted for Fall 2018 is improving the customer experience. Anyway, the point now is that I’m completely missing the VSAN menu options in the HTML5 client so the fallback is the FLEX based client which is working. Since I didn’t wanted to waste my time to debug  everything I raised a Support Request.

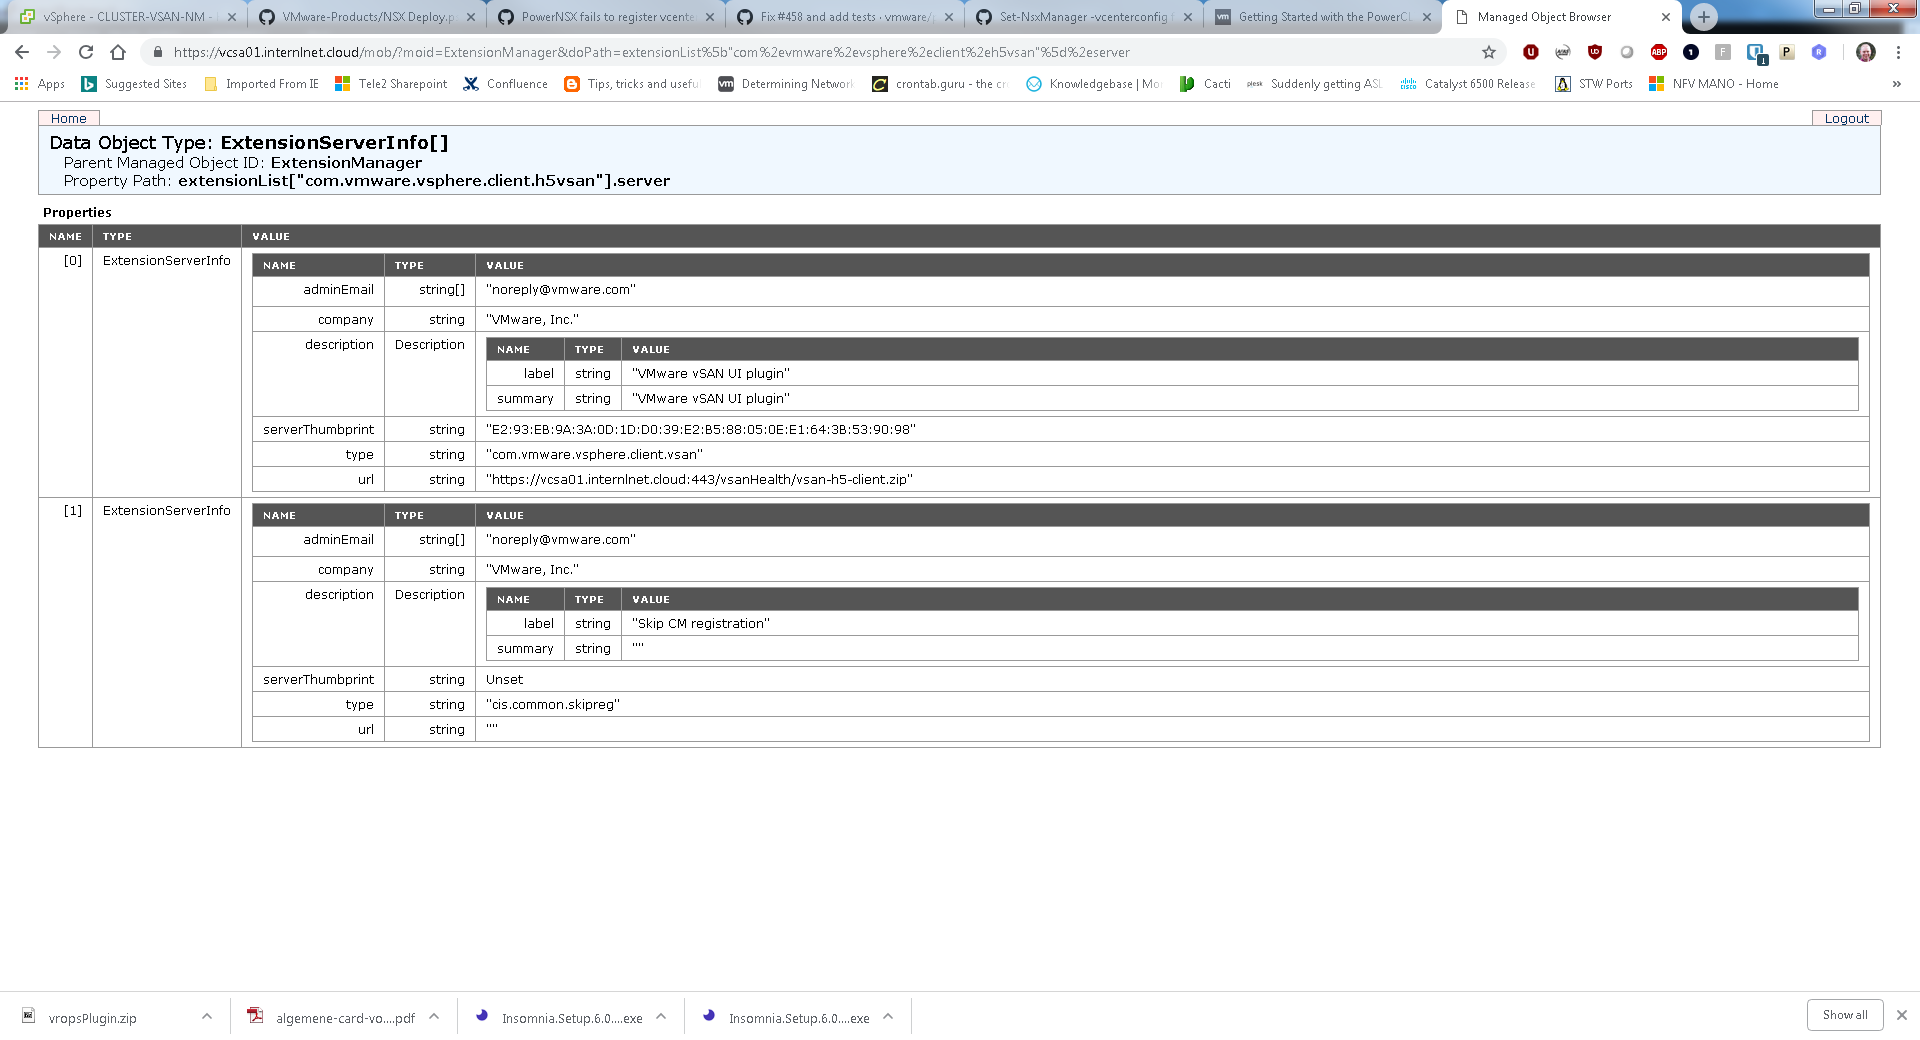
After several weeks they have found the issue due a thumbprint mismatch 🙁 Let’s explain a bit more about the configuration I’m running. It’s a vCenter with load balanced platform controllers with custom (proper) certificates. The thumbprint doesn’t get updated when you install custom certificates. But there is a work-arround (thanks Peter) to get it working.

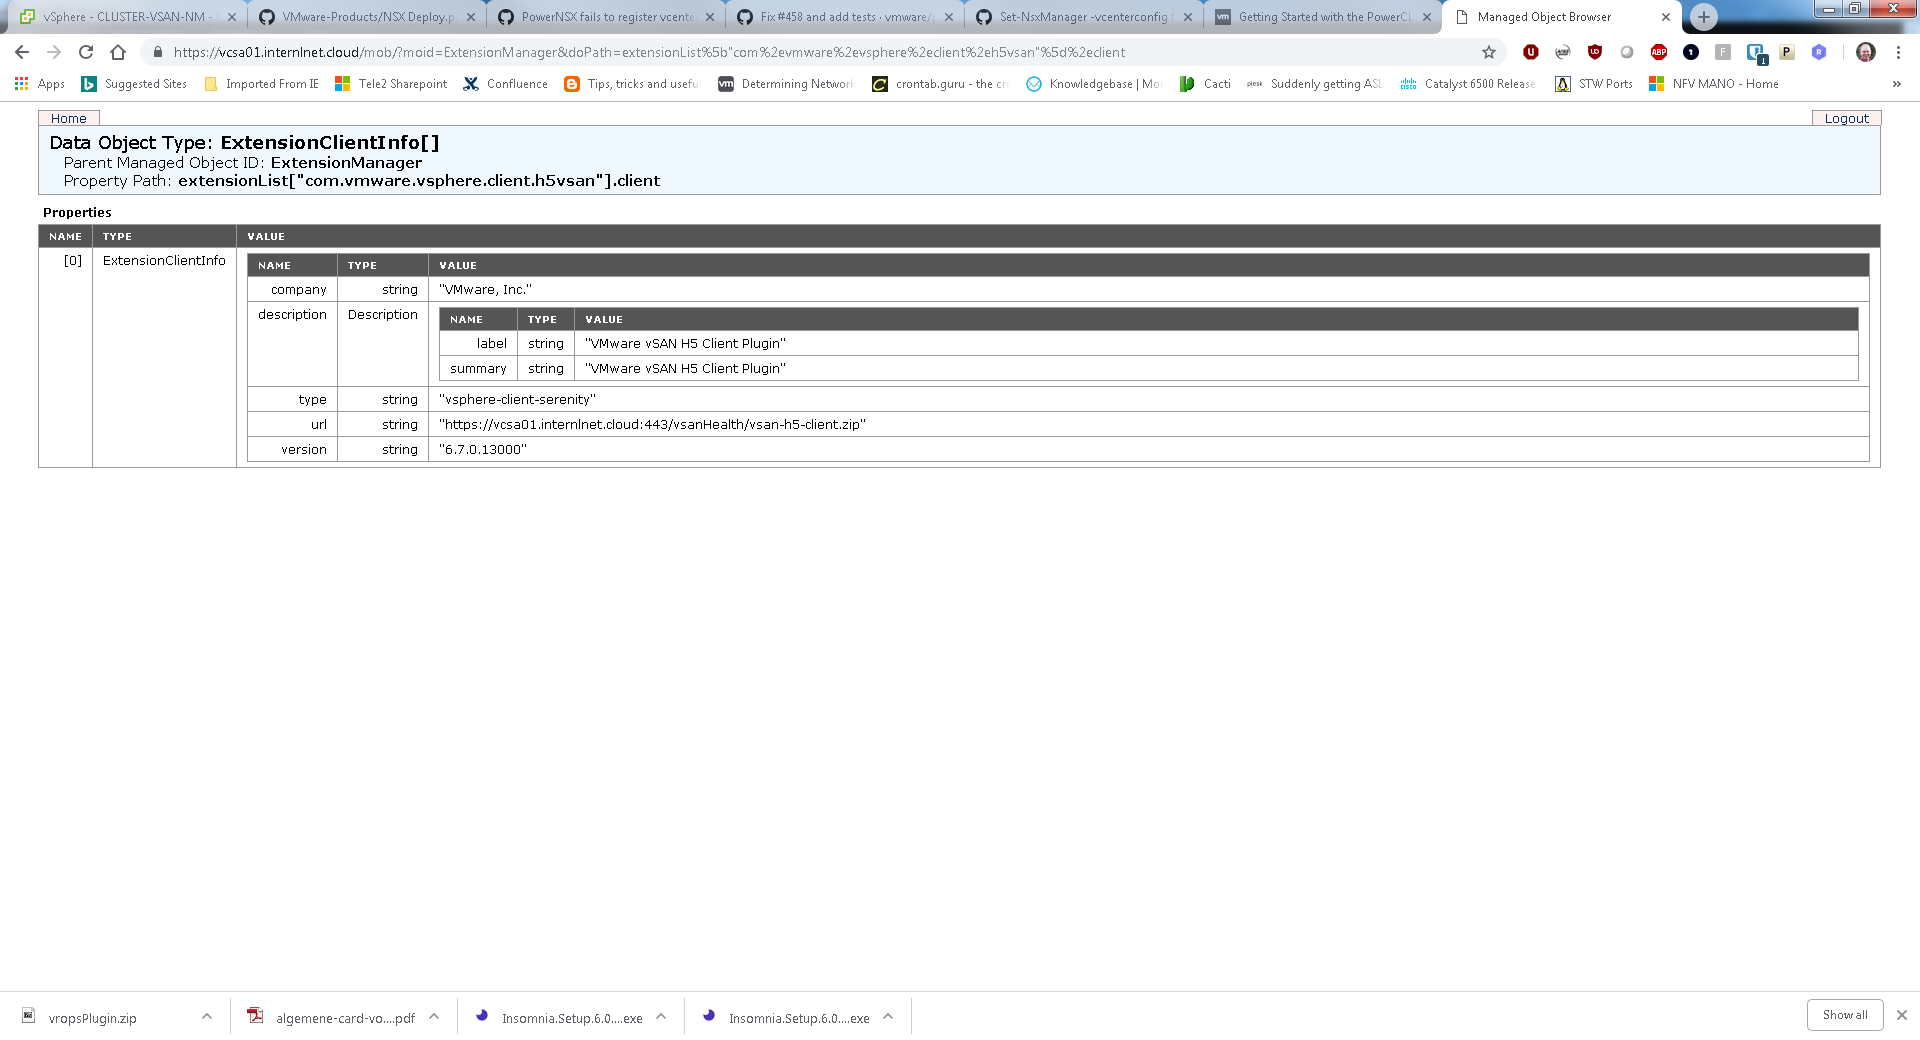
Let’s analyse the logs first why the H5VSAN plugin is not loading.

[2018-10-02T08:41:29.955Z] [INFO ] vc-extensionmanager-pool-242 70000299 100012 200003 com.vmware.vise.vim.extension.VcExtensionManager                  Downloading plugin package from https://vcsa01.demo.cloud:443/vsanHealth/vsan-h5-client.zip (no proxy defined)
[2018-10-02T08:41:29.979Z] [WARN ] vc-extensionmanager-pool-242 70000299 100012 200003 com.vmware.vise.vim.extension.VcExtensionManager                  Package com.vmware.vsphere.client.h5vsan was not installed. Error downloading https://vcsa01.demo.cloud:443/vsanHealth/vsan-h5-client.zip. Make sure that the URL is reachable then logout/login to force another download.

A normal local wget on the appliance is just downloading fine just like through the browser so the error is not very use full.

The only way to force the extensions to be activated on the appliance is to do it manually.

Create a directory with the name extensionsList[“XXX”]-[version] and unzip the contents of the zip file:

root@vcsa01 [ ~ ]# tail -f /storage/log/vmware/vsphere-client/logs/vsphere_client_virgo.log
root@vcsa01 [ ~ ]# mkdir -p /etc/vmware/vsphere-ui/vc-packages/vsphere-client-serenity/com.vmware.vsphere.client.h5vsan-6.7.0.13000
root@vcsa01 [ ~ ]# wget https://vcsa01.demo.cloud/vsanHealth/vsan-h5-client.zip
root@vcsa01 [ ~ ]# unzip vsan-h5-client.zip -d /etc/vmware/vsphere-ui/vc-packages/vsphere-client-serenity/com.vmware.vsphere.client.h5vsan-6.7.0.13000
root@vcsa01 [ ~ ]# rm vsan-h5-client.zip
root@vcsa01 [ ~ ]# service-control --stop vsphere-ui
root@vcsa01 [ ~ ]# service-control --start vsphere-ui

After this the HTML5 client for VSAN is loading correctly! This same principle is applicable for other extensions.

Running Home-Assistant with Docker containers on VIC

We’ve just deployed the Virtual Container Host (VCH) in the previous post. It’s time to run your first real world containers. In this post some containers for home automation will be deployed like Home-Assistant, Mosquitto, Node-RED.

First we deploy a container where you’ll get a GUI to have a view over your container deployment.

docker --tls run -d -p 8282:8282 --name admiral vmware/admiral
Unable to find image 'vmware/admiral:latest' locally
latest: Pulling from vmware/admiral
1c0b69d98c5b: Pull complete
a3ed95caeb02: Pull complete
f1bf54e3bee2: Pull complete
a636bec27aa0: Pull complete
9cf592e78ba2: Pull complete
827165f1c6de: Pull complete
3addb704a0c6: Pull complete
2ca7dc8e087d: Pull complete
e14e9eff31ca: Pull complete
2626a5abb3b1: Pull complete
f2c95f6064e6: Pull complete
Digest: sha256:82474001628fb5043caceb1c3c5a1c4a9b8246a84eddbf95756d46c125c51966
Status: Downloaded newer image for vmware/admiral:latest
390c91691cf551452a4aec72cadc9a420b7e5294a54624167b9ed298e067c043

You can browse now to http://#ip#:8282

Now we’re going to deploy containers with a persitent data volume so you easily update containers without loosing data. Keep in mind that you can’t extend data volumes but they are thin provisioned anyway. So create the persitent  volumes large enough by the beginning.

docker --tls volume create --name home_assistant_user_data --opt capacity=10GB
home_assistant_user_data
 
docker --tls run -d -p 8123:8123 -v home_assistant_user_data:/config -e "TZ=Europe/Amsterdam" --name home-assistant homeassistant/home-assistant
Unable to find image 'homeassistant/home-assistant:latest' locally
latest: Pulling from homeassistant/home-assistant
f49cf87b52c1: Pull complete
a3ed95caeb02: Pull complete
7b491c575b06: Pull complete
b313b08bab3b: Pull complete
51d6678c3f0e: Pull complete
09f35bd58db2: Pull complete
1bda3d37eead: Pull complete
9f47966d4de2: Pull complete
9fd775bfe531: Pull complete
075f8814af41: Pull complete
673b996ea6ee: Pull complete
13b5c6fd54a2: Pull complete
5627f8ac983a: Pull complete
9f49e962349f: Pull complete
69f64c4f5990: Pull complete
Digest: sha256:7e5acf3aba08350a62d2d531a4686bf15404cf29b0a3a68183c2f9c16be46c6d
Status: Downloaded newer image for homeassistant/home-assistant:latest
ca5b04071b24ea42afd51ed75f085520aff008095dcb4b225bd8aeb8b1fac405
 
docker --tls volume create --name node_red_user_data
node_red_user_data
 
docker --tls run -p 1880:1880 -v node_red_user_data:/data --name node-red nodered/node-red-docker
Unable to find image 'nodered/node-red-docker:latest' locally
latest: Pulling from nodered/node-red-docker
85b1f47fba49: Pull complete
a3ed95caeb02: Pull complete
ba6bd283713a: Pull complete
817c8cd48a09: Pull complete
47cc0ed96dc3: Pull complete
8888adcbd08b: Pull complete
6f2de60646b9: Pull complete
1dab1bd0d0d9: Pull complete
44ad4cf8b442: Pull complete
12fcc1c70dac: Pull complete
685330fe9c23: Pull complete
7d10c54dee0f: Pull complete
1fb8963ebd30: Pull complete
c451eb45c214: Pull complete
Digest: sha256:890f93b7f74398c3e77d21603342fc4d0d426e357914f2f10c38884c6d653a91
Status: Downloaded newer image for nodered/node-red-docker:latest
 
docker --tls volume create --name mosquitto_user_data
mosquitto_user_data
 
docker --tls run -d -p 1883:1883 -p 9001:9001 -v mosquitto_user_data:/mosquitto/data --name mosquitto eclipse-mosquitto
Unable to find image 'eclipse-mosquitto:latest' locally
latest: Pulling from library/eclipse-mosquitto
1160f4abea84: Pull complete
a3ed95caeb02: Pull complete
f1482e5005cd: Pull complete
670369387727: Pull complete
Digest: sha256:98a147e5b169dfbaf30ed7327c3677f63601892b1750860fd40fd01b52cee1ce
Status: Downloaded newer image for library/eclipse-mosquitto:latest
da0af95954d89d3e7c2b93c56709ee2f1651fe21cafa312c0757203811f7c064
 
docker --tls volume ls
DRIVER              VOLUME NAME
vsphere             home_assistant_user_data
vsphere             mosquitto_user_data
vsphere             node_red_user_data
 
docker --tls ps
CONTAINER ID        IMAGE                          COMMAND                  CREATED             STATUS              PORTS                                                      NAMES
632d654098ff        homeassistant/home-assistant   "python -m homeassis…"   5 days ago          Up 26 hours         192.168.1.18:8123->8123/tcp                                home-assistant
47b1a5ac0b7c        eclipse-mosquitto              "/docker-entrypoint.…"   3 weeks ago         Up 5 days           192.168.1.18:1883->1883/tcp, 192.168.1.18:9001->9001/tcp   mosquitto
490640cc5497        nodered/node-red-docker        "npm start -- --user…"   3 weeks ago         Up 5 days           192.168.1.18:1880->1880/tcp                                node-red
ddbc8657188d        vmware/admiral                 "/entrypoint.sh"         3 weeks ago         Up 5 days           192.168.1.18:8282->8282/tcp                                admiral

Some basic commands to manage your containers and volumes and how to update a container:

docker --tls exec -i -t home-assistant /bin/bash
docker --tls start home-assistant
docker --tls restart home-assistant
docker --tls image ls
docker --tls volume ls
docler --tls ps
Update Home-Assistant:
docker --tls stop home-assistant
docker --tls rename home-assistant home-assistant_0.6
docker --tls pull homeassistant/home-assistant
docker --tls run -d -p 8123:8123 -v home_assistant_user_data:/config -e "TZ=Europe/Amsterdam" --name home-assistant homeassistant/home-assistant
 
Delete container or volume:
docker --tls rm home-assistant_0.6
docker --tls volume rm home_assistant_user_data
 
Copy files between container and localhost:
docker --tls cp home-assistant:/config/configuration.yaml configuration.yaml
docker --tls cp home-assistant:/config/customize.yaml customize.yaml
docker --tls cp home-assistant:/config/automations.yaml automations.yaml
docker --tls cp configuration.yaml home-assistant:/config/configuration.yaml
docker --tls cp customize.yaml home-assistant:/config/customize.yaml
docker --tls cp automations.yaml home-assistant:/config/automations.yaml

Running Docker containers on ESXi standalone hosts with the vSphere Integrated Container engine

The vSphere Integrated Containers Engine (VIC Engine) is a container runtime for vSphere, allowing developers familiar with Docker to develop in containers and deploy them alongside traditional VM-based workloads on vSphere clusters, and allowing for these workloads to be managed through the vSphere UI in a way familiar to existing vSphere admins. Full support of vSphere Integrated Containers requires the vSphere Enterprise Plus license and an official VMware release of vSphere Integrated Containers.

But I was just curious if it is possible to use Docker containers to consolidate some of my own workloads on my ESXi standalone host. I’m now using full blown Virtual Machines running multiple services. With the container approach I can create segmentation and isolation and threat every service as an individual application.

We need to download and extract VIC for managing the Virtual Container Host (VCH) and installing Docker for container management.

Now first we’re deploying a VCH:

    1. Get fingerprint of ESXi host
      [root@esxi:~] openssl x509 -in /etc/vmware/ssl/rui.crt -fingerprint -sha1 -noout
      SHA1 Fingerprint=#fingerprint#
    2. Change firewall of ESXi host
      vic-machine-windows update firewall -target #user#:#password#@#host# -allow -thumbprint=#fingerprint#
      Dec 24 2017 09:14:38.107+01:00 INFO ### Updating Firewall ####
      Dec 24 2017 09:14:38.508+01:00 INFO Validating target
      Dec 24 2017 09:14:38.538+01:00 INFO Validating compute resource
      Dec 24 2017 09:14:38.538+01:00 INFO
      Dec 24 2017 09:14:38.542+01:00 WARN ### WARNING ###
      Dec 24 2017 09:14:38.544+01:00 WARN This command modifies the host firewall on the target machine or cluster
      Dec 24 2017 09:14:38.546+01:00 WARN The ruleset "vSPC" will be enabled
      Dec 24 2017 09:14:38.548+01:00 WARN This allows all outbound TCP traffic from the target
      Dec 24 2017 09:14:38.550+01:00 WARN To undo this modification use --deny
      Dec 24 2017 09:14:38.551+01:00 INFO
      Dec 24 2017 09:14:38.583+01:00 INFO Ruleset "vSPC" enabled on host "HostSystem:ha-host @ /ha-datacenter/host/#host#.#domain#.#tld#/#host#.#domain#.#tld#"
      Dec 24 2017 09:14:38.583+01:00 INFO
      Dec 24 2017 09:14:38.589+01:00 INFO Firewall changes complete
      Dec 24 2017 09:14:38.601+01:00 INFO Command completed successfully
    3. Deploy VCH host
      vic-machine-windows.exe create -target #user#:#password#@#host# -name vch --ops-user #user# --ops-password #password# -tls-cname vch -image-store #datastore#/vch-images -volume-store #datastore#/vic-volumes:default -bridge-network bridge-pg -public-network "VM Network" -public-network-gateway #gateway# -public-network-ip #ip#/24 -dns-server #dns1# -dns-server #dns2# --endpoint-memory 3072 --no-tlsverify -thumbprint=#fingerprint#
      Dec 24 2017 09:41:45.024+01:00 INFO ### Installing VCH ####
      Dec 24 2017 09:41:45.028+01:00 INFO vSphere password for root:
      Dec 24 2017 09:41:48.876+01:00 INFO Loaded server certificate vch\server-cert.pem
      Dec 24 2017 09:41:48.876+01:00 WARN Configuring without TLS verify - certificate-based authentication disabled
      Dec 24 2017 09:41:49.297+01:00 INFO Validating supplied configuration
      Dec 24 2017 09:41:49.549+01:00 INFO Configuring static IP for additional networks using port group "VM Network"
      Dec 24 2017 09:41:49.686+01:00 INFO Firewall status: ENABLED on "/ha-datacenter/host/#fqdn#/#fqdn#"
      Dec 24 2017 09:41:49.702+01:00 INFO Firewall configuration OK on hosts:
      Dec 24 2017 09:41:49.702+01:00 INFO "/ha-datacenter/host/#fqdn#/#fqdn#"
      Dec 24 2017 09:41:49.737+01:00 INFO License check OK
      Dec 24 2017 09:41:49.737+01:00 INFO DRS check SKIPPED - target is standalone host
      Dec 24 2017 09:41:49.817+01:00 INFO
      Dec 24 2017 09:41:50.245+01:00 INFO Creating Resource Pool "vch"
      Dec 24 2017 09:41:50.258+01:00 INFO Creating VirtualSwitch
      Dec 24 2017 09:41:50.381+01:00 INFO Creating Portgroup
      Dec 24 2017 09:41:50.471+01:00 INFO Creating appliance on target
      Dec 24 2017 09:41:50.506+01:00 INFO Network role "public" is sharing NIC with "management"
      Dec 24 2017 09:41:50.506+01:00 INFO Network role "client" is sharing NIC with "management"
      Dec 24 2017 09:41:50.761+01:00 INFO Creating directory [ESXI] vic-volumes
      Dec 24 2017 09:41:50.778+01:00 INFO Datastore path is [ESXI] vic-volumes
      Dec 24 2017 09:41:51.183+01:00 INFO Uploading images for container
      Dec 24 2017 09:41:51.183+01:00 INFO "appliance.iso"
      Dec 24 2017 09:41:51.184+01:00 INFO "bootstrap.iso"
      Dec 24 2017 09:42:06.318+01:00 INFO Waiting for IP information
      Dec 24 2017 09:42:18.140+01:00 INFO Waiting for major appliance components to launch
      Dec 24 2017 09:42:18.514+01:00 INFO Obtained IP address for client interface: "#host#"
      Dec 24 2017 09:42:18.514+01:00 INFO Checking VCH connectivity with vSphere target
      Dec 24 2017 09:42:18.916+01:00 INFO vSphere API Test: https://#host# vSphere API target responds as expected
      Dec 24 2017 09:42:28.049+01:00 INFO Initialization of appliance successful
      Dec 24 2017 09:42:28.049+01:00 INFO
      Dec 24 2017 09:42:28.054+01:00 INFO VCH Admin Portal:
      Dec 24 2017 09:42:28.058+01:00 INFO https://#host#:2378
      Dec 24 2017 09:42:28.059+01:00 INFO
      Dec 24 2017 09:42:28.061+01:00 INFO Published ports can be reached at:
      Dec 24 2017 09:42:28.063+01:00 INFO #host#
      Dec 24 2017 09:42:28.069+01:00 INFO
      Dec 24 2017 09:42:28.071+01:00 INFO Docker environment variables:
      Dec 24 2017 09:42:28.074+01:00 INFO DOCKER_HOST=#host#:2376
      Dec 24 2017 09:42:28.083+01:00 INFO
      Dec 24 2017 09:42:28.084+01:00 INFO Environment saved in vch/vch.env
      Dec 24 2017 09:42:28.085+01:00 INFO
      Dec 24 2017 09:42:28.088+01:00 INFO Connect to docker:
      Dec 24 2017 09:42:28.090+01:00 INFO docker -H #host#:2376 --tls info
      Dec 24 2017 09:42:28.092+01:00 INFO Installer completed successfully
    4. Show container host information
      set DOCKER_HOST=tcp://#host#:2376
      docker --tls info
      Containers: X
       Running: X
       Paused: 0
       Stopped: 0
      Images: 5
      Server Version: v1.3.0-15556-473375a
      Storage Driver: vSphere Integrated Containers v1.3.0-15556-473375a Backend Engine
      VolumeStores: default
      vSphere Integrated Containers v1.3.0-15556-473375a Backend Engine: RUNNING
       VCH CPU limit: 4864 MHz
       VCH memory limit: 4.511 GiB
       VCH CPU usage: 614 MHz
       VCH memory usage: 5.445 GiB
       VMware Product: VMware ESXi
       VMware OS: vmnix-x86
       VMware OS version: 6.5.0
       Registry Whitelist Mode: disabled.  All registry access allowed.
      Plugins:
       Volume: vsphere
       Network: bridge
       Log:
      Swarm: inactive
      Operating System: vmnix-x86
      OSType: vmnix-x86
      Architecture: x86_64
      CPUs: 4864
      Total Memory: 4.511GiB
      ID: vSphere Integrated Containers
      Docker Root Dir:
      Debug Mode (client): false
      Debug Mode (server): false
      Registry: registry.hub.docker.com
      Experimental: false
      Live Restore Enabled: false
    5. Start first ‘management’ container
      docker --tls run -d -p 8282:8282 --name admiral vmware/admiral
      Unable to find image 'vmware/admiral:latest' locally
      latest: Pulling from vmware/admiral
      1c0b69d98c5b: Pull complete
      a3ed95caeb02: Pull complete
      f1bf54e3bee2: Pull complete
      a636bec27aa0: Pull complete
      9cf592e78ba2: Pull complete
      827165f1c6de: Pull complete
      3addb704a0c6: Pull complete
      2ca7dc8e087d: Pull complete
      e14e9eff31ca: Pull complete
      2626a5abb3b1: Pull complete
      f2c95f6064e6: Pull complete
      Digest: sha256:82474001628fb5043caceb1c3c5a1c4a9b8246a84eddbf95756d46c125c51966
      Status: Downloaded newer image for vmware/admiral:latest
      390c91691cf551452a4aec72cadc9a420b7e5294a54624167b9ed298e067c043
    6. Browse to http://#host#:8282/ and add the VCH host under Clusters and view the logging of the VCH host at http://#host#:2376/.

You can make the DOCKER_HOST variable persistent on MACHINE level during reboots:

PS > [Environment]::SetEnvironmentVariable("DOCKER_HOST", "tcp://#host#:2376", "Machine")
PS > Get-ChildItem Env:DOCKER_HOST
Name Value
---- -----
DOCKER_HOST tcp://#host#:2376

How to deploy VMware vSphere Integrated Containers (OVA) on ESXi

Normally it’s quite hard to deploy an OVA on your ESXi (free) when you don’t have a vCenter in place. In the past William Lam wrote how you could deploy an OVA on an Apple Mac OS X with govc. I used that as basis for the deployment of VIC with a Windows based environment.

The first step is off course to download the OVA and the govc tool for your Windows installation.  Upload the OVA to your datastore of your ESXi host and open a command prompt and browse to your govc tool and paste the following:

set GOVC_INSECURE=1
set GOVC_URL=$IP
set GOVC_USERNAME=$USERNAME
set GOVC_PASSWORD=$PASSWORD
set GOVC_DATASTORE=$DATASTORE
set GOVC_NETWORK="VM Network"
set GOVC_RESOURCE_POOL=Resources

If you run something like below command you’ll see some information about your host:

C:\Users\%USERNAME%\Downloads>govc_windows_amd64 about
Name: VMware ESXi
Vendor: VMware, Inc.
Version: 6.5.0
Build: 6765664
OS type: vmnix-x86
API type: HostAgent
API version: 6.5
Product ID: embeddedEsx
UUID:

After the you can request the import specification of the OVA trough:

govc_windows_amd64 import.spec vic-v1.2.1-4104e5f9.ova > vic.json
notepad vic.json and change:
{"Key":"appliance.root_pwd","Value":"$PASSWORD"}
{"Name":"Network","Network":"$NETWORK"}
{"Key":"network.fqdn","Value":"$FQDN"}
"Name":"$NAME"
govc_windows_amd64 import.ova -options=vic.json vic-v1.2.1-4104e5f9.ova

This will result in:

C:\Users\%USERNAME%\Downloads>govc_windows_amd64 import.ova -options=vic.json vic-v1.2.1-4104e5f9.ova
[10-12-17 00:23:14] Uploading vic-4104e5f9-disk1.vmdk... OK00%, 12.0MiB/s)
[10-12-17 00:23:21] Uploading vic-4104e5f9-disk2.vmdk... OK00%, 11.7MiB/s)

You can edit the new Virtual Machine how you want it trough the ESXi UI!

Kernel panic – not syncing: Attempted to kill init!

It’s probably too late when you visit this page and the suffering has already accomplished. Anyway, the reason the virtual machine won’t boot is because the VMware Tools are updated on a legacy Linux operating system and a proper driver for the SCSI-controller can’t be found anymore. There is a similar case after converting a physical machine in KB1002402. The full error message you’re facing looks like this:

Kernel panic - not syncing: Attempted to kill init!
Kernel panic – not syncing: Attempted to kill init!

There is no way to rescue the virtual machine without booting from a ISO like Knoppix because we need to rebuild the ramdisk including the right SCSI-controller drivers. Go to the shell and do the following:

mkdir -p /recovery
mount /dev/sda1 /recovery
mount -o bind /dev /recovery/dev
mount -o bind /proc /recovery/proc
chroot /recovery
vi /etc/modprobe.conf
#REMOVE:
alias scsi_hostadapter megaraid_mbox
#ADD:
alias scsi_hostadapter mptbase
alias scsi_hostadapter1 mptscsi
alias scsi_hostadapter2 mptscsih
alias scsi_hostadapter3 mptfc
alias scsi_hostadapter4 mptspi
alias scsi_hostadapter5 mptsas
cat /boot/grub/grub.conf
mkinitrd -v -f /boot/initrd-KERNELVERSION.img KERNELVERSION
exit
umount /recovery/dev
umount /recovery/proc
umount /recovery
reboot

The virtual machine is able to boot again so your problem is solved, you think! Actually it’s solved for the moment… It all started when we migrated the virtual machines to vSphere 5.0 where new VMware Tools are being used off course. As a system operator you want that the VMware Tools are running the current version and you’ll update them (automatically). While the VMware Tools are being updated the ramdisk is also rebuilded and in a normal situation that isn’t a problem at all. The first update touched the /etc/modprobe.conf and that’s why we edited it and rebuilded the ramdisk. With a upgrade from vSphere 5.0 to vSphere 5.1 new tools are available again and updated automatically because the box “Check and upgrade Tools during power cycling” is checked. The expected behavior would be that the update occurs after a reboot but that isn’t the case apparently. The VMware Tools were updated on the fly. Then again it shouldn’t brake the virtual machine but it did :(! The /etc/modprobe.conf is touched and all changes were thrown away. To fix the issue again, before a reboot has taken place, do the following:

vi /etc/modprobe.conf
#REMOVE:
alias scsi_hostadapter megaraid_mbox
#ADD:
alias scsi_hostadapter mptbase
alias scsi_hostadapter1 mptscsi
alias scsi_hostadapter2 mptscsih
alias scsi_hostadapter3 mptfc
alias scsi_hostadapter4 mptspi
alias scsi_hostadapter5 mptsas
mkinitrd -v -f /boot/initrd-`uname -r`.img `uname -r`
reboot

The virtual machine will boot properly now but what will happen when there is a new VMware Tools update :)? If you’re still using the LSI Logic Parallel SCSI-controller you can also change it to the newer LSI Logic SAS SCSI-controller due these modifications.

vCenter Single Sign On Service: the horror!

Since the introduction of vCenter Single Sign-On there are a lot of issues reported about logging on to vCenter. Every installation is different but a lot of us just do the simple installation which suits the needs for most environments. In case you did and are facing issues that you can’t log on anymore to your vCenter this could be the solution. If it is a upgrade to vSphere 5.1 or a fresh installation doesn’t matter. The most of us use the option ‘Use Windows session credentials’ and ‘Login’.

vSphere Client: Login

After a while you receive an error message that there was a error while connecting to the vCenter server.

vSphere Client: Error Connecting

That’s not what we wanted to see and it also didn’t do that prior the previous versions of vCenter. In the past there were some issues that looks exactly the same, see KB1032641. When checking the vSphere Client logs you’ll notice the following message:

<Error type=”VirtualInfrastructure.Exceptions.RequestTimedOut”>
<Message>The request failed because the remote server ‘vc’ took too long to respond. (The command has timed out as the remote server is taking too long to respond.)</Message>
<InnerException type=”System.Net.WebException”>
<Message>The command has timed out as the remote server is taking too long to respond.</Message>
<Status>Timeout</Status>
</InnerException>
<Title>Connection Error</Title>
<InvocationInfo type=”VirtualInfrastructure.MethodInvocationInfoImpl”>
<StackTrace type=”System.Diagnostics.StackTrace”>
<FrameCount>7</FrameCount>
</StackTrace>
<MethodName>Vmomi.ServiceInstance.RetrieveContent</MethodName>
<Target type=”ManagedObject”>ServiceInstance:ServiceInstance [vc]</Target>
</InvocationInfo>
<WebExceptionStatus>Timeout</WebExceptionStatus>
<SocketError>Success</SocketError>
</Error>

In this case the firewall isn’t the problem but has something to do how the vSphere client and Single Sign On works. It makes difference if you use the option to ‘Use Windows session credentials’ or just type the same credentials manually. Without using the option I was able to log on with a domain account which is in the same domain as the vCenter server is joined. That domain was auto discovered during the installation of vCenter Single Sign On. To use other external domains for authentication you need to add your external domains as ‘Identity Source’ in the SSO Configuration, see KB2035510. When using the vSphere Web Client I was able to log on most of the time with an external domain account but certainly not always and with the vSphere Client sporadic. It’s still strange that logging into vCenter did work sometimes 😉 To fix this issue properly we need to make sure that the used ‘Identity Source’ is added to the ‘Default Domains’. Also order the ‘Default Domains’ to your needs and don’t forget to press the ‘Save’ button, very important! After doing this everything will work like a charm.